Here is one of the pictures featuring the How Do I Save It. Numerous images associated with the How Do I Save It can be utilized as your point of reference. Below, you'll find some additional pictures related to the How Do I Save It.
Here's How to Save $15 on the New Google Pixel Buds Pro at Launch
Here's How to Save $15 on the New Google Pixel Buds Pro at Launch
Announced in May at Google's I/O developer conference, the new Google Pixel Buds Pro wireless earbuds are now available to preorder. Retailing for $200 and taking aim squarely at Apple's AirPods Pro, these are Google's first active noise-canceling earbuds and you can score a set of Pixel Buds Pro at a discount before they even launch right now via Wellbots. When placing your preorder there, simply use coupon code CNET15 for an instant $15 price cut, dropping your new earbuds down to only $185.
Google put emphasis on the active noise cancellation performance of the Pixel Buds Pro at I/O (video), touting its Silent Seal technology designed to provide a tight seal for blocking out outside sound while avoiding that feeling of built-up pressure. When you need to let outside noises back in, the Pixel Buds Pro's transparency mode allows you to do just that without removing the earbuds.
Other neat features include support for multipoint Bluetooth connections, IPX4 water resistance, Qi wireless charging support and up to 31 hours of listening time(that includes the capacity of the charging case). Unlike Apple's AirPods earbud lineup, Google's Pixel Buds Pro are available in multiple colors, namely charcoal, fog, coral and lemongrass, for a little added personality.
Google Pixel Buds Pro preorders are slated to start shipping on July 26 and shipping at Wellbots is free.
Vivo's X60 Pro Plus has a Snapdragon 888 and a 55-watt charger in the box
Vivo's X60 Pro Plus has a Snapdragon 888 and a 55-watt charger in the box
Vivo is one of China's biggest phone brands, and now it's teaming up with German lensmaker Zeiss to level up its photography game. Those boosted cameras, plus a gorgeous display and impressive battery features, make Vivo's newest phones worthy of your attention.
Vivo unveiled its inaugural global flagship phones for this year, announcing the X60, X60 Pro, and the X60 Pro Plus, on Thursday. Positioning the X60 Pro Plus as a "professional photography flagship," Vivo is flexing its maiden collaboration with Zeiss, which co-engineered the device's image system. Although Vivo is relatively unknown in the West, the Chinese company is one of the world's top 10 phone manufacturers by market share -- and it's used by several Avengers too.
I spent a couple of days with the highest-end X60 Pro Plus, and can say it delivers on a premium Android experience complete with some extra bells and whistles you may not expect. There's a 6.56-inch AMOLED display, a speedy refresh rate (120Hz), the newest Qualcomm processor available (Snapdragon 888), fast charging (55-watt bundled charger) and a periscope-style telephoto camera seen on ultra-premium flagships such as Samsung's Galaxy S21 Ultra.
Apart from the Zeiss collaboration and the incremental upgrades, new to the series is the X60 Pro Plus' so-called extended RAM technology. Vivo claims 3GB of the phone's "idle" storage can be used as RAM to "achieve a +3GB RAM effect," promising to boost the device's performance.
Missing in the X60 Pro Plus are things like an IP rating for water resistance, which many phones of this class have, and expandable storage. That will be forgivable for most since the one variant of this phone has 256GB storage.
At the time of this writing, Vivo didn't share how much these phones will cost internationally, but we can look at the X60's pricing in its native China as a reference point (although prices tend to vary depending on country). The base X60 Pro starts at 4,498 yuan (converts to about $690, £500 or AU$910), and the X60 Pro Plus starts at 5,998 yuan (about $920, £670 or AU$1,210). Unfortunately, Vivo currently has no US rollout plans, but it shouldn't be too difficult to import. It's being released in more than 20 markets worldwide including the UK, India, the Middle East and Europe over the next few months.
The X60 Pro Plus has periscope lens bragging rights
The Vivo X60 Pro Plus has four rear cameras, consisting of a standard lens, ultra-wide lens, portrait lens, and a periscope-style telephoto lens (just like its predecessor). Huawei's P30 Pro was the first phone to include a Periscopic lens, which allows for insane long zooming, and it's since been picked up by Samsung on its Ultra phones. Apple is rumored to adopt the technology late next year. Compared to regular telephoto cameras that offer 2x or 3x optical zoom, periscope-style cameras can typically do 5x or even 10x optical zoom by using more than one lens along with the camera sensor. For its part, the X60 Pro Plus boasts 5x optical zoom, and 60x digital zoom.
Last year, I showed you how far you can zoom in with 60x zoom on the Vivo X50 Pro, so you can take a look at that to get a sense of this phone's digital zoom capabilities.
The X60 Pro Plus has a periscope-style telephoto camera capable of 10x optical zoom and 60x digital zoom.
Sareena Dayaram/CNET
Vivo X60 Pro Plus cameras in action
Whether I was attempting to snap the perfect portrait of my dog napping in our living room or action shots of Rocky running on a hiking trail, the five cameras on this phone, along with the many accompanying modes, made it easy to take wonderful and versatile shots. Night-time imaging was impressive too, with the X60 Pro Plus taking crisp, detailed photos. There is also night mode for video on the main camera.
Even when I took pictures facing bright, sunlit windows, the camera managed to capture punched-up images of the indoor surroundings. Below you can see what I'm talking about, especially when juxtaposed with iPhone 12 Pro Max photo, which took more true-to-life, albeit less saturated photos. Whatever you prefer is likely a matter of personal preference. I realize this might not be an apples-to-apples comparison (pun intended), but my hope is that it gives you an indication of where the X60 Pro Plus stands on the spectrum of phone cameras.
Taken with the Vivo X60 Pro Plus. The furniture looks more saturated here than in the image below taken with the iPhone 12 Pro Max below.
The X60 Pro Plus features a design similar to a number of high-end Android phones we've seen in recent years. On the front is a curved display with a centrally located punch-hole notch, and on the back there's a "vegan" leather rear that reminds me of last year's Oppo's Find X2 Pro.There's a camera bump on the back and a blue Zeiss label emblazoned on its right side. I realize Vivo wants to flex its partnership with the 175-year-old German lensmaker, but I think it could have achieved a similar result with more subtle labelling.
Speaking of the display, the X60 Pro Plus relied on a high-res AMOLED display (made by Samsung). It has a speedy refresh rate of 120Hz, but you can dial it back to 60Hz if you want to save on battery life. Most phones have refresh rates of 60Hz, which means the screen refreshes 60 times in a second. 120Hz displays can look a lot smoother when scrolling through webpages.
Vivo
Vivo X60 Pro Plus has 55-watt bundled charger
The X60 Pro Plus astounded me with its blazing-fast charging speeds. In fact, this was probably one of my favorite features because you only need 20 minutes for your phone to get enough charge to last you between a half or full day. Within 20-25 minutes, the 55-watt in-box charger juiced up the phone from 0% to around 70%, and within 45 minutes the 4,200-mAh battery was fully revitalized.
The X60 Pro Plus runs on the Snapdragon 888, Qualcomm's latest processor found in a number of Android flagships including Samsung's Galaxy S21 Ultra and Xiaomi's Mi 11. This chipset is backed by 12GB RAM and 256 GB of storage. Vivo claims 3GB of the phone's storage can be used as RAM, giving you that extra dose of power when multiple apps are running in the background. Vivo claims its new memory management relies on algorithms to lets 3GB of idle storage to "assume the function" of RAM, resulting a boost in memory usage efficiency by 37%. You probably won't notice a difference at first, but in theory it should mean better performance when your phone is loaded with apps.
Vivo X60 Pro Plus vs. X60 Pro
Vivo X60 Pro Plus
Vivo X60 Pro
Display size, resolution
6.56-inch AMOLED "flexible screen", FHD+ (1080 x 2400 pixels)
6.56-inch AMOLED "flexible screen", FHD+ (1080 x 2400 pixels)
Midnight black: 158.58x73.24x7.59 mm and shimmer blue: 158.58x73.24x7.69 mm
Weight (Ounces, Grams)
191 grams
177 grams for midnight black, 179 grams for shimmer blue
Mobile software
Android 11
Android 11
Video capture
4K
4K
Processor
Snapdragon 888
Snapdragon 870
Storage
256GB
256GB
RAM
12GB
12GB
Expandable storage
No
No
Battery
4,200 mAh
4,200 mAh
Special features
55-watt fast charging (in box charger), 120Hz, 60x hybrid zoom, 5x optical zoom, dual SIM
33-watt fast charging (in box charger), dual SIM, 120 Hz screen
Price off-contract (USD)
N/A
N/A
Price (GBP)
N/A
N/A
Price (AUD)
N/A
N/A
§
Apple analyst Ming-Chi Kuo says in a research note that iPhones will likely get a periscope-style telephoto camera lens in 2022 if lens suppliers Semco and Sunny Optical join the Apple supply chain this year, according to reports from MacRumors and 9-to-5 Mac. This means that a much better camera could be coming to iPhones, with lenses similar to those used in some Huaweiphones today.
The design differences would likely be minimal, since periscope-style telephoto lenses don't extend out from the body of a phone, but rather within it, according to the reports. Apple previously adopted 2x telephoto lenses in its 2016 iPhone 7 Plus, but a shift to periscope-style lenses could bring that zoom power up to 5x or more. The improved range and depth of the lens would bring its cameras into competition with the Samsung Galaxy S20 Ultra and Huawei P40 Pro Plus, both of which have cameras with up to 10x zoom.
Kuo said he believes the new lenses will be featured in the iPhone 12 in 2022.
Apple didn't immediately respond to CNET's request for comment.
Try This Surprisingly Smart Lightbulb Tip (Your Uber Driver Will Thank You)
Try This Surprisingly Smart Lightbulb Tip (Your Uber Driver Will Thank You)
This story is part of Home Tips, CNET's collection of practical advice for getting the most out of your home, inside and out.
Light bulbs that change colors on command are a smart home staple, but there aren't a lot of obvious ways to make them a practical part of your day-to-day. Sure, they're lots of fun for a kids room, and useful to have at Halloween or when you're throwing a party, but how often have those colors actually come in handy?
The truth about color-changing smart bulbs is that it's all about how -- and where -- you use them. If you've been looking for new ways to put them to work, there's one spot at home you might not have considered, and I'm confident that it's a place where you'll get plenty of practical use out of those automated color changes.
See that blue light on the porch? So can your delivery driver -- and in a multiunit home like this one, it's a great way to help them find the right door.
Ry Crist/CNET
Stick a multicolor smart bulb on your front porch
Or your stoop. Or your front window. Or the light in the yard -- wherever, just so long as you've got a color-changing bulb that people can see from the street. That last bit's important, because we're going to use this thing as a signal that helps people find your house -- specifically, the rideshare and delivery drivers trying to earn a living by bringing meals, groceries and other home goods to your doorstep.
With Americans staying home more than ever during the past two years, delivery services like those have seen massive growth. If you're anything like me, you've come to appreciate the occasional (OK, more than occasional) convenience of a well-timed burrito delivery in the middle of your remote workday. With a color-changing smart bulb outside your home, it's easy to help those drivers find your address -- just change the color to something distinctive when you order and make a note to your driver to look for the colored light. You'll be doing your driver a solid, and helping ensure that your food gets to the right place, too.
Along with deliveries and pickups, it's also a useful trick when you're having people over for a social visit. And, even when you aren't using it to help people find your place, a bulb on your porch that you can set to turn on automatically whenever the sun goes down is great to have on hand, not to mention the fact that you'll have a nice head start on the Halloween decorations. Here's how to get it set up.
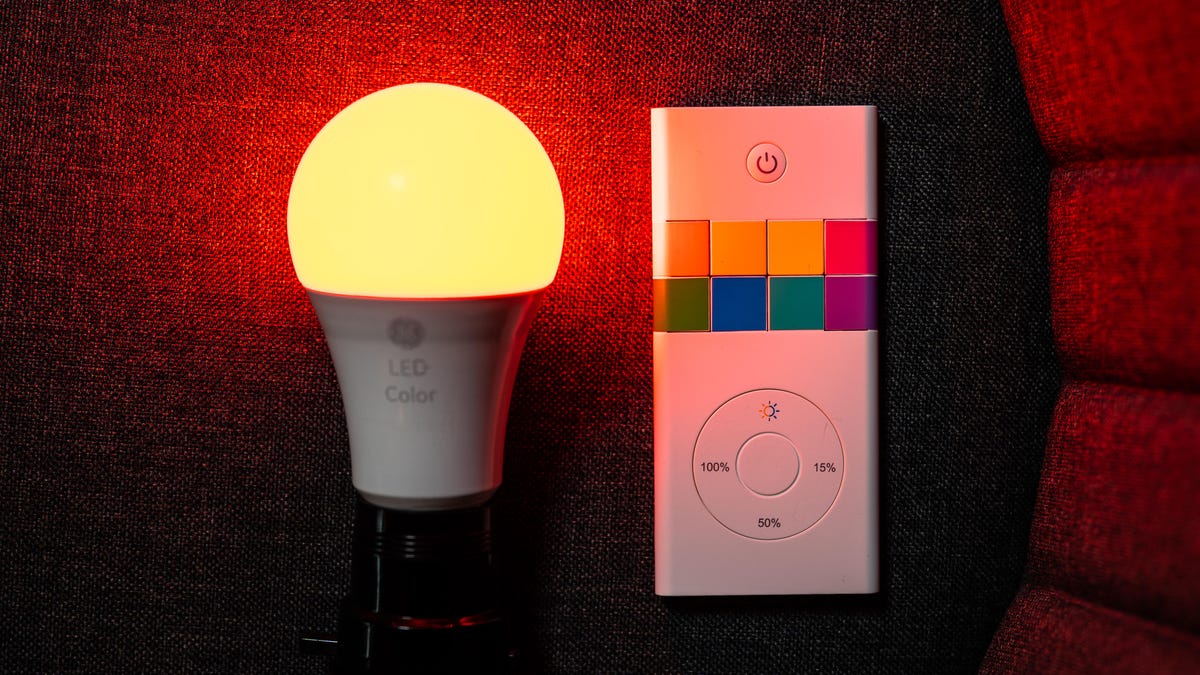
Just about any color-changing smart bulb will work -- and if you don't want your bulb to be smart, a nonconnected color-changing bulb with a remote like this one from GE will do the job, too.
Chris Monroe/CNET
Step 1: Pick out a bulb
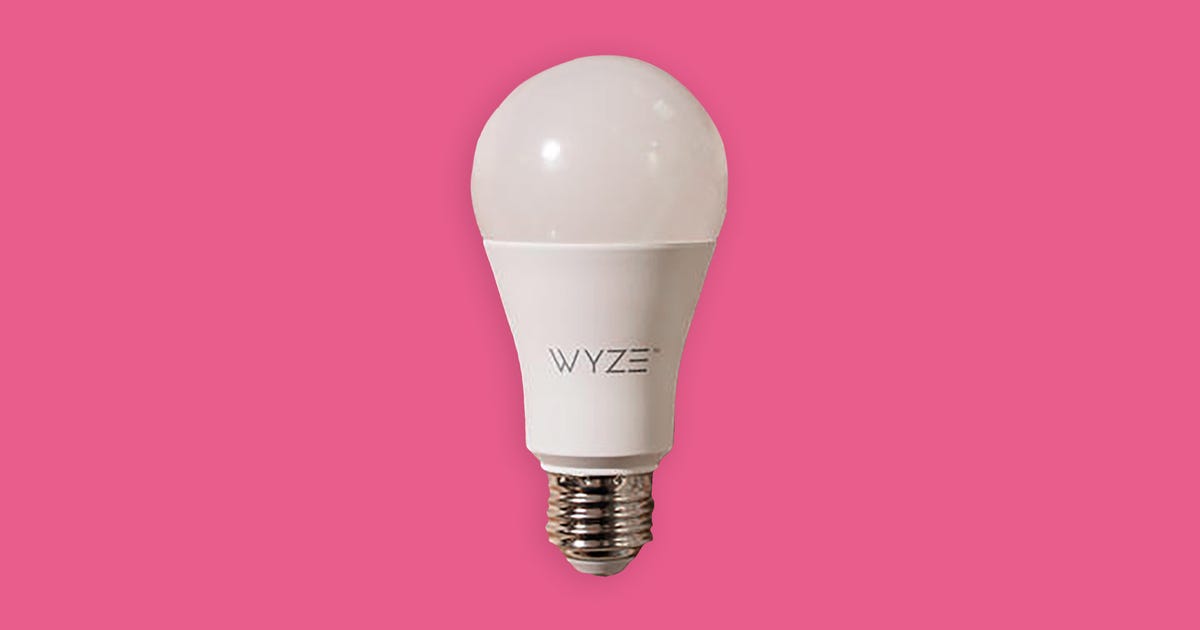
You've got no shortage of options here. Big names like Philips Hue and Lifx will get the job done, but less expensive bulbs from Sengled, GE Cync, Wyze, TP-Link Kasa, Govee and others will work, too, so in most cases you won't need to spend more than $15 per bulb or so. If you need a floodlight instead of a standard, A-shaped bulb, you'll find lots of options, as well: Cree, Feit Electric, Lifx, Philips Hue, Sengled, Wiz and others all sell them, and most cost less than $20.
Any color-changing bulb will do, but you'll want to put some thought into how you plan to control the thing. All of them should let you change the color from your phone, using an app, but if you already use voice assistants or home automation platforms in your house -- Alexa, Google Assistant, Apple HomeKit, SmartThings -- you'll want to make sure to pick a bulb that works with your setup. Later this year, smart bulbs that support Matter, a new universal smart home standard that works with all of those other platforms, should start hitting the market, too.
And, if you aren't interested in smart bulbs that you can control with your voice or with an app, that's fine: Just look for nonsmart color-changing bulbs that come with a remote, like this one from GE. Again, you shouldn't need to spend much more than $10.
Step 2: Pair with your bulb
This part's easy -- just screw the bulb in where it needs to go, turn it on, download the app to your Android or iOS device, and follow the instructions to pair it with your phone.
Keep in mind that different bulbs connect in different ways. If it's a Wi-Fi bulb, it'll pair directly with your home network via your router. If it's a Bluetooth bulb, it'll pair directly with your phone whenever it's within Bluetooth range. Zigbee bulbs need a Zigbee hub on your network that's capable of receiving the signal and translating it into something your router can work with.
Once you've connected, you can use the bulb's app to change the color yourself whenever you're expecting a delivery. If your bulb supports voice commands via Alexa, Google Assistant or Siri -- and just about all of them do at this point -- the app should offer instructions on how to set that up, as well.
Most meal delivery apps have a field where you can leave instructions for your driver at checkout. This is where you want to tell them to look for the light.
Screenshot by Ry Crist/CNET
Step 3: Give your driver a heads up
Don't forget to loop your driver in on the plan. Before you place your order or request a ride pickup, look for a field where you can leave special instructions for your driver -- tell them to "look for the blue light," and you'll be all set. Same goes for pizza delivery if you're ordering online, or via the brand's app.
And that should do it -- a color-changing bulb on the porch that'll help delivery drivers find your front door each and every time you order. It's novelty meets practicality, all without costing very much, and a great way to put those colors to work.
For more tips, check out five inexpensive ways to tech out your patio, and which appliances you should unplug at home to save money.
DIY faucet replacement: No, you don't need a plumber's help
DIY faucet replacement: No, you don't need a plumber's help
Like many others, due to the coronavirus I've spent the past eight weeks working from home, trying to teach my kids and staring at all of the home improvement projects I haven't had time to tackle. First up on the list: changing out an old two-handle faucet and replacing it with a fancier single-handle faucet with removable spray nozzle.
Fortunately, modern plumbing and faucet design have made changing faucets easy. It's a quick day project that makes a significant difference to the look of your space, and you can save lots of money by skipping the plumber and doing it yourself.
So, here's a full rundown on how you can do just that. Just note that the faucet I installed isn't straight out of the box (we've had it around for awhile), so your experience may vary.
See ya later, two-handle faucet.
Chance Lane/CNET
Out with the old
First, shut off your water. You likely have two shut-off valves under your sink, one each for the hot and cold water supply lines. Turn off the water by turning these valves clockwise. You shouldn't need a wrench for this.
If there aren't any valves under the sink, then you'll need to follow the supply lines away from the faucet until you find a valve. You may end up shutting the water down at the water heater (and water heater bypass for cold), or the main valve. In this case, leave all the faucets on the lowest floor turned on to drain water from the entire system.
After you've shut the water off, turn on the faucet you're changing to make sure the water is actually shut off: If water continues to flow, you have a faulty valve. With a bucket and towel handy for any residual water, use an adjustable wrench to remove the supply lines. Stabilize the valve assembly with a pair of slotted pliers as you loosen the water line connection; this will keep the valve and line from twisting and getting damaged.
Once the valves are disconnected, you'll need to remove the old faucet assembly. It's held on by one or more retaining nuts under the sink, depending on the current configuration. These are sometimes difficult to access and you may need what's called a basin wrench. If you're lucky, a specific socket wrench may have been provided with the faucet. Once the retaining nuts are removed, you should be able to remove the old faucet from the sink.
With the old faucet removed, we can slide the new one in and start working to get it connected.
Chance Lane/CNET
In with the new
There are a variety of configurations for faucets. Between the number of handles, spray nozzle types and even spacing of required holes, there are a lot of ways to customize. Before you buy a new faucet, consider your arrangement, specifically the current number and location of holes in your counter or sink. Sinks and countertops can be modified accordingly, but you'll need to do a little research prior to purchasing your new faucet.
You might need a basin wrench or a specific socket wrench that came with your faucet in order to turn the retaining nuts.
Chance Lane/CNET
Start by putting the bracket that fits between the counter/sink and faucet in place. These will often have a foam underlay that will form a seal to help prevent water from seeping underneath the faucet assembly. Some faucets may differ, but the faucet I installed required minimal assembly prior to installation.
Run the supply lines of the faucet assembly, followed by the threaded rods of the faucet, through the holes in your countertop or sink. Working underneath in the most comfortable position you can find (good luck), tighten the retaining nut with a wrench.
If no socket wrench was provided with the faucet, and the space is tight enough to require a basin wrench, be extra-careful not to damage the faucet's water supply lines. It depends on the configuration of your particular faucet, but if the water lines are in the way of the retaining nut It could be beneficial to wrap them with nylon tape or some other protective material before doing this. Damaging water lines could cause a leak, and all of the mayhem that comes with that. You don't want that.
Be sure to take care when connecting your faucet to the water supply lines -- doing the job right can help you prevent leaks later on.
Chance Lane/CNET
Seal the deal with strong connections
Now, it's time to connect the faucet's water supply lines to the shut-off valve beneath the sink. With mine, the water lines were attached to the new faucet, but this isn't always the case. If you need to supply the water lines, it's recommended to change out hoses even if the ones you already have are compatible. If these hoses wear out and leak, you could have some trouble on your hands.
You'll want to apply a thin wrap of Teflon thread tape in a clockwise direction (the same direction you will turn the nut to tighten) around the threaded male connections to lubricate the threads, which allows for a better seal. Finger-tighten the threaded nut valve connections -- then, while holding the valve assembly with a pair of slotted pliers, finish tightening the connection with an adjustable wrench.
Slowly turn your water supply back on while checking for leaks. If the water flows normally and everything down below stays dry, then you're all set.
Once the new faucet is in, remove the aerator from the spray nozzle and run the water for a minute or so to clear your plumbing of any debris.
Chance Lane/CNET
Finish with a flush
It's a good idea at this point to flush out your lines to get rid of any debris you may have loosened up in your water lines. To do so, remove the aerator from the faucet tip and let the water run for about a minute. Sometimes a tool is supplied with the faucet to make removing the aerator easier. If you can't remove the aerator, remove the entire nozzle head and let the water run for a bit.
And that's it -- you can scratch that fancy new faucet installation off of your to-do list and move on to something else. I might recommend a nice glass of water and a nap, assuming the kids cooperate.
How to buy a laptop to edit photos videos organic gardening how to buy a laptop to edit photos videos editor how to buy a laptop to edit photos videos damage how to buy a laptop touchpad how to buy a laptop to chromecast how to buy a laptop in dank memer how to buy a laptop youtube how to buy amazon return pallets how to buy a domain name how to buy a tesla how to lower blood pressure how to download youtube videos
How to Buy a Laptop to Edit Photos, Videos or for Other Creative Tasks
How to Buy a Laptop to Edit Photos, Videos or for Other Creative Tasks
Are you baffled by the multitude of laptop, desktop and tablet options being hurled at you as a generic "creative" or "creator"? Marketing materials rarely distinguish among the widely varying needs for different pursuits; marketers basically consider anything with a discrete GPU (a graphics processor that's not integrated into the CPU), no matter how low power, suitable for all sorts of creative endeavors. That can get really frustrating when you're trying to wade through a mountain of choices.
On one hand, the wealth of options means there's something for every type of work, suitable for any creative tool and at a multitude of prices. On the other, it means you run the risk of overspending for a model you don't really need. Or more likely underspending, and ending up with a system that just can't keep up, because you haven't judged the trade-offs of different components properly.
One thing hasn't changed over time: The most important components to worry about are the CPU, which generally handles most of the final quality and AI acceleration for a growing number of smart features; GPU, which determines how fluidly your screen interactions are along with some AI acceleration as well; the screen; and the amount of memory. Other considerations can be your network speed and stability, since so much is moving up and down from the cloud, and storage speed and capacity if you're dealing with large video or render files.
You still won't find anything particularly budget-worthy for a decent experience. Even a basic model worth buying will cost at least $1,000; like a gaming laptop, the extras that make it worth the name are what differentiates it from a general-purpose competitor, and those always cost at least a bit extra.
Andrew Hoyle/CNET
Should I get a MacBook Pro or a Windows laptop?
If what you're really wondering is whether the Mac is generally better than Windows for graphics, that hasn't been true for a while. Windows' graphics programming interface has gotten a lot better over time, which allows for broader support and better performance in the applications. But performing display calibration on both platforms can feel like walking barefoot over broken glass. Windows, because its color profile management seems like it hasn't changed since it originally launched in Windows NT, and MacOS because interface changes made in Monterey combined with ambiguity about supported calibrators, software and the new MacBook Pro screens has some folks gnashing their collective teeth.
MacBook Pros now have native M1 processor support for most of the important applications, which includes software written to use Metal (Apple's graphics application programming interface). But a lot of software still doesn't have both Windows and MacOS versions, which means you have to pick the platform that supports any critical utilities or specific software packages. If you need both and aren't seriously budget-constrained, consider buying a fully kitted-out MacBook Pro and running a Windows virtual machine on it. That's an imperfect solution, though, since VMs tend to be fairly bad ab out being able to access the full capabilities of the GPU.
Dan Ackerman/CNET
How do I know what specs are important?
The first decision you need to make is whether you'll need a workstation-class system or can get away with a normal laptop; the latter is generally cheaper. In order to use some advanced features, accelerate some operations or adhere to certain security constraints, some professional applications require workstation-class components: Nvidia A- or T-series or AMD W-series GPUs rather than their GeForce or Radeon equivalents, Intel Xeon or AMD Threadripper CPUs and ECC (error correction code) memory.
Nvidia loosened the reigns on its division between its consumer GPUs and its workstation GPUs with a middle-ground Nvidia Studio. The Studio drivers, as opposed to GeForce's Game Ready ones, add optimizations for more creation-focused applications rather than games, which means you don't necessarily have to fork over as much cash.
Companies which develop professional applications usually provide guidance on what some recommended specs are for running their software. If your budget demands that you make performance trade-offs, you need to know where to throw more money. Since every application is different, you can't generalize to the level of "video-editing uses CPU cores more than GPU acceleration" (though a big, fast SSD is almost always a good idea). The requirements for photo editing are generally lower than those for video, so those systems will probably be cheaper and more tempting. But if you spend 90% of your time editing video, it might not be worth the savings.
There are a few generalizations I can make to help narrow down your options:
More and faster CPU cores -- more P-Cores if we're talking about Intel's new 12th-gen processors -- directly translate into shorter final-quality rendering times for both video and 3D and faster ingestion and thumbnail generation of high-resolution photos and video. Intel's new P-series processors are specifically biased for creative (and other CPU-intensive) work.
More and faster GPU cores plus more graphics memory (VRAM) improves the fluidity of much real-time work, such as using the secondary display option in Lightroom, scrubbing through complex timelines for video editing, working on complex 3D models and so on.
Always get 16GB or more memory. Frankly, that's my general recommendation for Windows systems (MacOS runs better on less memory than Windows). But a lot of graphics applications will use as much memory as they can get their grubby little bits on; for instance, I've never seen Lightroom use less than all the available memory in my system (or CPU cores) when importing photos.
Stick with SSD storage and at least 1TB of it. Budget laptops may have a slow, secondary spinning disk drive to cheaply pad about the amount of storage. And while you could get away with 512GB, you'll probably find yourself having to clear files off onto external storage a little too frequently.
Get the fastest Wi-Fi possible, which at the moment is Wi-Fi 6E. Much has become split between the cloud and local storage, and even if you don't intend to use the cloud much your software may force it on you. For instance, Adobe really, really wants you to use its clouds and is moving an increasing amount of your files to cloud-only. And if you accidentally save that 256MB Photoshop file in the ether, you're in for a rude awakening when you try to open it next.
Do I need a 4K or 100% Adobe RGB screen?
Not necessarily. For highly detailed work -- think a CAD wireframe or illustration -- you might benefit from the higher pixel density of a 4K display, but for the most part, you can get away with something lower (and you'll be rewarded with slightly better battery life, too).
Color is more important, but your needs depend on what you're doing and at what level. A lot of manufacturers will cut corners with a 100% sRGB display, but it won't be able to reproduce a lot of saturated colors; it really is a least-common-denominator space, and you can always buy a cheap external monitor to preview or proof images the way they'll appear on cheaper displays.
For graphics that will only be appearing online, a screen with at least 95% P3 (aka DCI-P3) coverage is my general choice, and they're becoming quite common and less expensive than they used to be. If you're trying to match colors between print and screen, then 99% Adobe RGB makes more sense. Either one will display lovely saturated colors and the broad tonal range you might need for photo editing, but Adobe RGB skews more toward reproducing cyan and magenta, which are important for printing.
A display that supports color profiles stored in hardware, like HP's Dreamcolor, Calman Ready, Dell PremierColor and so on, will allow for more consistent color when you use multiple calibrated monitors. They also tend to be better, as calibration requires a tighter color error tolerance than typical screens. Of course, they also tend to be more expensive. And you frequently need to step up to a mobile workstation for this type of capability; you can use hardware calibrators such as the Calibrite ColorChecker Display (formerly the X-Rite i1Display Pro) to generate software profiles, but they're more difficult to work with when matching colors across multiple connected monitors.
How a 50 gadget is saving 840 a year on my electricity provider how a 50 gadget is saving 840 a year on my electricity cost how a 50 gadget is saving 840 aesthetic ideas how a 50 gadget is saving 840 arcadia how a 50 gadget is saving 840 am radio how a 50 gadget is saving private how a 50 gadget is saving hope how a 50 gadget is saving 10 how a 500 gallon propane tank works how a 50 caliber incendiary works how am i supposed to live without you how are social security benefits calculated
How a $50 gadget is saving $840 a year on my electricity bill
How a $50 gadget is saving $840 a year on my electricity bill
Each month for the past six months, my electric company has sent me a letter in the mail to let me know my household uses more energy than my neighbors. (Shocking, I know.)
Out of the closest 100 homes, I paid more than anyone else. In other words, my home ranked dead last, at 100.
Soon after the first letter, I turned into my parents and hounded my kids each time I caught them leaving a light on. I installed LED bulbs and we switched our Xbox One's energy-saving mode on. The next month, our bill was no better, and my wife and I once again nabbed the 100th spot.
Putting our pride aside, we decided it was time to get serious and see just where our electricity (and cash) was being drained throughout our home.
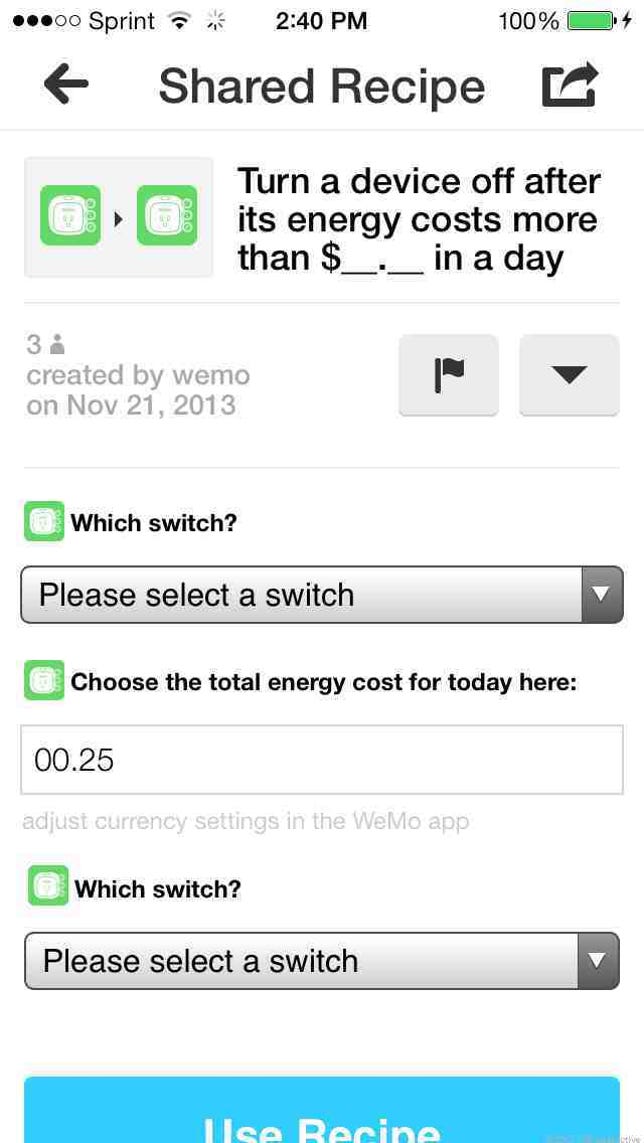
How the WeMo Insight saved me $70 a month
The WeMo Insight Switch IFTTT channel has plenty of free, useful recipes like this one.
Screenshot by Rich Brown
Using Belkin's $50 WeMo Insight -- a small device you can plug anything into to find out its energy costs -- I methodically went around the house, plugging various appliances into the gadget. I would leave each appliance plugged in for three to four days to get a generalized estimate of usage. Of course, the longer you leave something plugged in to Insight, the more accurate the cost estimate will be.
$2.50 a month to run this 10-gallon fish tank? I'll take it.
Jason Cipriani/CNET
I started with our fish tank and discovered it sets us back about $2.50 a month to run. Then I moved to an old refrigerator in our basement used for keeping boxes of Popsicles and random drinks cool for us. To my surprise, that old pile of scrap metal was costing us over $40 per month in electricity. We replaced it the next day with a deep freezer-turned-refrigerator that now costs us less than $1 per month.
Our main refrigerator was sucking $27 worth of electricity, and has since been replaced (I haven't had a chance to figure its monthly cost yet). Lastly, I discovered the small space heater I was using to make my office livable during the cold Colorado winters was averaging $98 per month to run -- an insane amount. I'll be replacing it when the weather starts to cool down again.
Belkin's product isn't the only device that can help you save money. iDevice's Switch does the same thing, and is priced around $40. Neurio takes a broader approach, attaching to your home's breaker panel to monitor the devices plugged into your grid for energy use.
Read more about what the WeMo Insight can do in our full review.
Pixel 6a vs samsung galaxy a53 vs nothing phone under 20000 pixel 6a vs samsung galaxy a53 vs nothing phone under 25k pixel 6a vs samsung galaxy a53 vs nothing phone under 30k pixel 6a vs samsung galaxy a53 vs nothing phone 1 pixel 6a vs samsung galaxy a53 vs nothing phone release pixel 6a vs samsung galaxy a53 vs nothing phone specs pixel 6a vs samsung galaxy a53 vs nothing phone company pixel 6a vs samsung galaxy a53 5g pixel 6a vs samsung galaxy a53 case google pixel 6a vs samsung s20 pixel 6a vs 5a google pixel 6a release date
Pixel 6A vs. Samsung Galaxy A53 vs. Nothing Phone: Under-$500 Phones Compared
Pixel 6A vs. Samsung Galaxy A53 vs. Nothing Phone: Under-$500 Phones Compared
Phones that cost just under $500 are looking better and better as 2022 continues, with Samsung, Google and new contender Nothing all offering three phones at pretty much identical $450 prices. All three of these phones promise a slick and enjoyable experience, even with their lower prices.
The Google Pixel 6A has already earned itself a glowing review, with CNET's Lisa Eadicicco calling it "the best budget Pixel yet." Meanwhile I myself was impressed with the Nothing Phone 1's balance of price and performance -- not to mention its flashing rear lights. Then there's the Samsung Galaxy A53 5G, which earned a great review score thanks to its price, its display and its cameras.
But which phone is actually deserving of your hard-earned cash? I got hold of all three to put them through their paces.
Andrew Lanxon/CNET
Price and availability: The Nothing Phone 1 is hard to get
Let's start with a biggie. the Nothing Phone 1 is on sale in the UK and wider Europe but a rollout into the US is so far uncertain. While Nothing has said it would like to launch its phone in the US, it needs a network partner to make it compatible with US 5G networks. As of the time of writing, there are no plans for a proper US launch. People in the US can easily get the Pixel 6A and the Galaxy A53 5G, however.
All three phones start at very similar prices; $450 for the Pixel 6A, $450 for the Galaxy A53 and $472 for the Nothing Phone 1, based on a conversion from its UK price. In the UK, all three phones start at £399. Simple.
Design and display: Nothing's flashing lights stand out
While many phones in recent years have been forgettable-looking slabs, all three of these midrangers have designs that are very much their own. The A53 keeps things simple with a plastic back, raised camera unit and metallic edging. The Pixel 6A maintains the distinctive camera bar seen on its pricier siblings and while its back is technically plastic, you'd be hard pressed to tell it apart from the glass back of the 6 and 6 Pro.
Andrew Lanxon/CNET
Between the two, the Pixel 6A has a more premium feel, than the plasticky A53, but it's the Nothing Phone 1 that stands out in the looks department. That's due to its transparent back panel, which not only provides a unique view of its internal components but also allows for its light-up LED "glyph" to pulse when you get notifications. It's arguably a gimmick and one that you may not care about at all, but it's certainly fun and it's nice to have something quirky at this price.
The Pixel 6A is the smaller of the three, packing a 6.1-inch display against the Nothing's 6.55-inch and the A53's 6.5-inch screens. That said, the Pixel's resolution results in a pixel density higher than its competitors, although all three are pin sharp with vibrant colors and high brightness levels. The Nothing's extra size might make it the better choice for mobile gamers among you, or those of you who watch a lot of video on the move, but they all do a good job of displaying vibrant content and colorful games.
Power and performance: Pixel 6A packs a punch
The Nothing Phone 1 makes use of a Snapdragon 778G+ processor and 12GB of RAM (as reviewed), while the Galaxy A53 5G uses an Exynos 1280 chip and 6GB of RAM. The Pixel 6A meanwhile uses Google's own custom-built Tensor processor with 6GB of RAM.
And that Tensor processor put in some excellent scores on our suite of benchmark tests, that put it consistently above the other two. The Nothing was a fair second, while the A53 did somewhat fall behind on both CPU and graphics benchmarks.
Performance comparison chart
Nothing Phone 1
Galaxy A53 5G
Legend:
Geekbench 5 (Single core)
Geekbench 5 (Multi-core)
3DMark Slingshot Unlimited
Note:
Longer bars equal better performance
Benchmarks alone aren't a perfect indicator of real-world performance however and I found all three to be perfectly capable of handling the essentials well. Navigating the interfaces was swift and lag-free on all models and all of them handled more demanding gaming in Asphalt 9: Legends without any noticeable stuttering or slow-down. Video streaming was no problem on any phone and I could immediately jump between open apps with the multitasking switcher.
Over time I would expect the Pixel 6A to generally perform better as it's already starting from a more powerful position. It might mean that as even more demanding games arrive it's well-placed to handle them in a way that perhaps the A53 couldn't. Right now though, any of your everyday emailing, Instagramming, Candy Crushing, WhatsApp group message avoiding fun will be handled perfectly well by any of these phones.
Cameras: Pixel 6A strikes the right balance
All three phones have multiple rear cameras, giving both standard views and ultrawide shots. The A53 includes a 5-megapixel macro camera and a depth sensor for portrait photos, but it's the main and wide cameras you'll likely find yourself using most often. Samsung's phone cameras have often had a tendency to look overly saturated and contrasty and that's absolutely the case with the A53.
Galaxy A53 main camera test.
Andrew Lanxon/CNET
Nothing Phone 1 main camera test.
Andrew Lanxon/CNET
Pixel 6A main camera test.
Andrew Lanxon/CNET
Its shots are consistently punchy with the colors, to the point that they look as though you've slapped on some high-contrast filter on Instagram. The Nothing Phone 1 goes the other way, however, with frequently muted tones. It's particularly noticeable when you switch to the Phone 1's ultrawide lens, which produces drab-looking images that look almost shameful against the others.
Galaxy A53 ultrawide camera test.
Andrew Lanxon/CNET
Nothing Phone 1 ultrawide camera test.
Andrew Lanxon/CNET
Pixel 6A ultrawide camera test.
Andrew Lanxon/CNET
It's the Pixel 6A that consistently produces the most balanced-looking images in both its standard and ultrawide views. The 6A's colors are accurate and vibrant, without looking overly processed, and it generally captures a more balanced exposure than the other two, keeping bright skies under control well.
Galaxy A53 main camera test.
Andrew Lanxon/CNET
Nothing Phone 1 main camera test.
Andrew Lanxon/CNET
Pixel 6A main camera test.
Andrew Lanxon/CNET
All three phones are perfectly capable of taking decent snaps at your next family picnic, but if photography prowess is important to you then the Pixel 6A is the one to go for.
Battery life: A close fight but Pixel 6A takes the win
With a huge 5,000-mAh battery stuffed inside I expected the Galaxy A53 to put in the best performance when it came to battery life. It's a more capacious cell than the 4,410 mAh of the Pixel 6A or the 4,500 mAh of the Nothing Phone 1. On my tests, however, it was the Pixel that managed to edge out the competition.
After 1 hour of streaming a YouTube video on Wi-Fi, with the screens set to maximum brightness, the Pixel had dropped from full to 98% remaining. The Nothing Phone 1 dropped to 95% in the same time, while the A53 dropped to 94%. After a second hour, the Pixel had dropped to 92%, with the Nothing phone coming in a close second at 90%, with the A53 having dropped to 89%.
Andrew Lanxon/CNET
Sure, the Pixel technically did the best here, but we're really only talking a few percentage points between them, which isn't a big deal. All three put in solid performances: Both here and in everyday use, the battery lift you can expect to see will vary depending on how much you demand of your phone.
With careful use you won't struggle to get a full day out of any of the phones, and all three will likely want a full recharge every night.
Software and other features
All three phones run Android 12 at their core, but you will find some notable differences in the experience. The Pixel 6A runs a pure, Google-produced version of Android 12. It's a clean and clutter-free experience that I've enjoyed using for some time on the Pixel 6 and 6 Pro. The Nothing Phone 1 has a visual skin that includes different colors, fonts and backgrounds, but it's also neat and stripped-back, making it smooth and simple to navigate.
The A53 immediately annoyed me with a variety of prebundled apps, including ones for Booking.com, TikTok, Nextdoor and a variety of Samsung's own apps and stores. These apps make the phone feel cluttered before you've even begun to install your own. There are two different messaging apps, for example -- Google's and Samsung's -- so Android novices might find it more complicated to get to grips with.
Andrew Lanxon/CNET
The A53 does have a killer feature not found on the other two though: expandable storage. While the Pixel 6A comes with 128GB of storage and the Nothing Phone 1 is available with up to 256GB, the Galaxy A53's 128GB of storage can be expanded with microSD cards up to 1TB in size. That makes it a great option if you take a lot of photos or videos or want to save a lot of media locally to your phone to enjoy when you don't have an internet connection.
Which phone should you buy?
The Nothing Phone 1's unique design certainly gives it an edge over the others, but if you're not bothered about those flashy lights, you love taking wide-angle photos on vacation -- or if you live in the US and can't even buy it -- then you should look toward the others.
While the A53 5G performed admirably in our tests, it was the Pixel 6A that consistently came out on top. Its processor performance is better, it takes better photos from both its cameras, its pure Android interface is nicer to navigate and it even feels like the more premium device when you hold it.
The A53 is larger and its expandable storage gives it a definite one-up if you want to store a lot of media, but overall it's the Pixel 6A that offers the best value for money.
Pixel 6A vs. Nothing Phone 1 vs. Galaxy A53 5G specs comparison chart